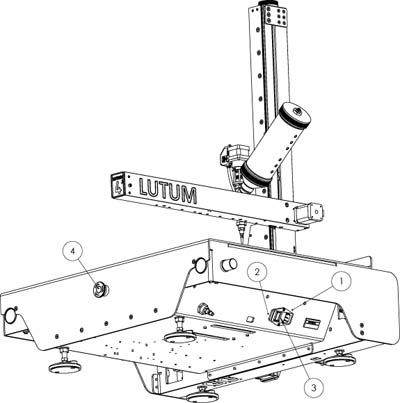
1. If the emergency stop button [4]is pressed, turn it slightly to release, the printer should switch on.
2. If the emergency button is not pressed find the main power connector[1] on the right side of the printer where the power cable from your power source socket attaches to the printer. Next to the attached cable is a switch [2], turn this switch on.
3. Now release the emergency stop button by turning it slightly. The printer should turn on.
4. If the printer still does not turn on, check if your power cord is attached properly and you have voltage on your socket.
If the printer still does not turn on you may have a bigger issue. Inside the printer powersocket is a fuse. [3] You can check the fuse by removing the power cable and pull out the fuse holder. If the fuse is blown contact VormVrij® for replacement.
The LUTUM v3.9 has the switch and fuse in front, no emergency stop.
The LUTUM v3 has the switch in front without a changeable fuse and without the emergency stop button, you need to engage both front switches to turn on the printer.
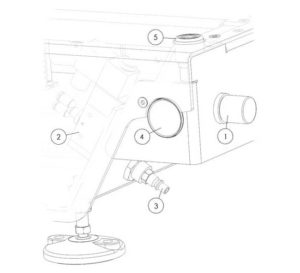 The printer has two air pressure regulators on each side, they are operated by rotating the knob [1] clockwise to increase pressure, reverse to decrease.
You can push the knob to lock it in position.
Pull to be able to adjust the pressure.
The manometer [4]will display the current pressure you supply to the cartridge.
However, the air supplied to the printer [3]needs to be of good quality and dehumidified. The maximum supply pressure is 6 bar. Any higher and the safety valve [2] will engage and start to release air.
It is good practice to release the air pressure when the printer is offline. Newer v4.3 and up printers have an automatic pressure release valve[2].
If the supply air is moist, the valves can corrode and get stuck. You will need to replace the air regulator if that happens.
You can remove the regulator following the below steps, the part can be reached from below:
- remove the manometer with a 14 spanner
- remove the top air coupler with a 14 spanner
- remove the brass ring with a set of large plyers
- disconnecting the 4mm air tube
- You can now take the regulator from the housing
- remove the final air tube connector with a 10 spanner
follow the above steps in reverse to install the new regulator.
The printer supply air coupling is of the standard 14Ka male type (Orion type). The regulator is a Bosch – Aventics FD: 918, mnr. 0821302727, (7290) G1/8, made in Germany.
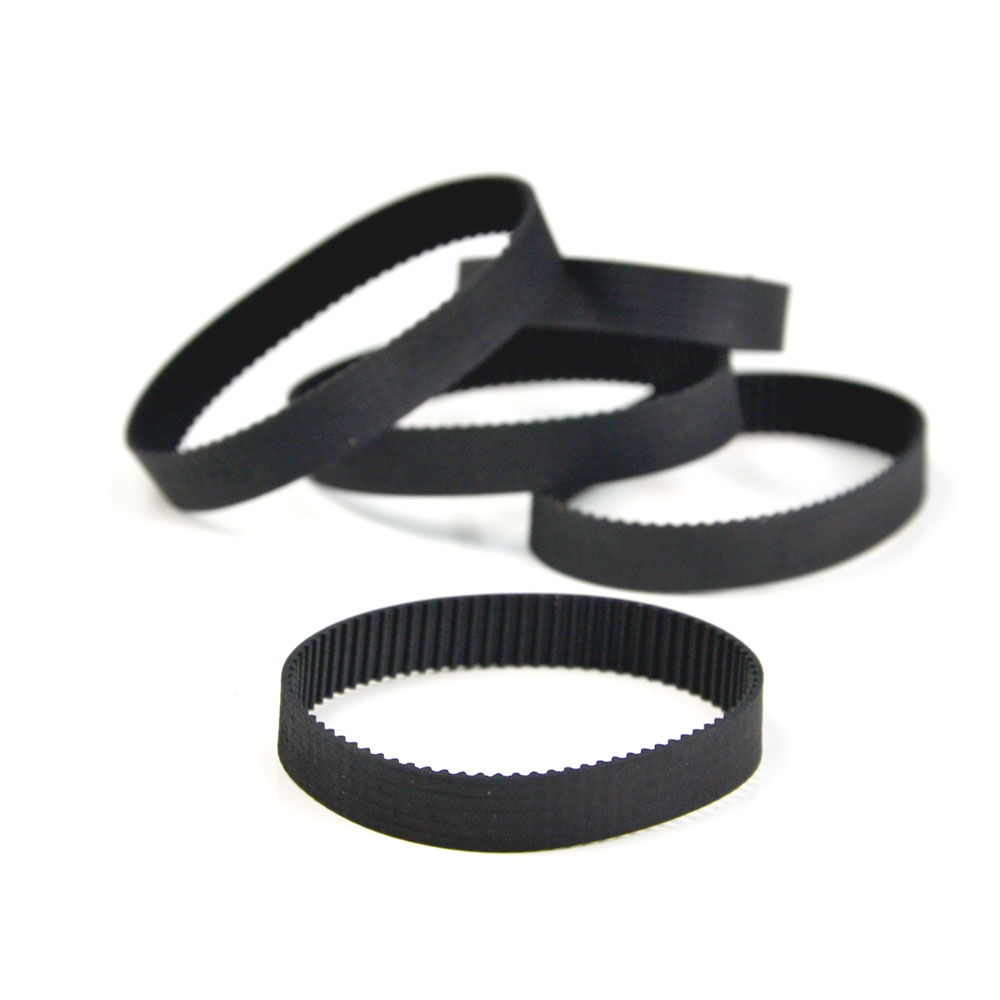
In the unlikely event the wheel on top of the Z-pole does not rotate while you hear the Z motor run after you gave the move-Z command the solution could be a bit more complicated.
open the Z motor cover and check..
- 1. Check the belt, if it is broken or badly worn: you will need to order a replacement Z belt. Please contact us for further instructions.2. if the belt is turning but not the spindle: the pully lock nuts from the spindle pully have come loose.
Tighten to fix the issue.3. If the belt is not rurning but the motor is: the pully lock nuts from the motor pully have come loose.
Tighten to fix the issue .
If the wheel does turn but the X arm is not moving up or down follow the dislodged X-arm link.
If the Z axis is stalling going up or down and the motor makes an unusual higher pitch sound there is too much friction on the Z arm. Before contacting VormVrij check the following:
- Check if the X arm is dislodged and blocking movement
(see previous question) - Did you place extra weight other than extruders and cartridged on the arm?
Remove the weight. - Did you follow the maintenace guide for lubrication of the Z spindle?
This is normally needed every 3 to 6 months, but we noticed that this very much depends on the local conditions and the type of prints you make. It is possible that the upper section of the arm is used less and does not receive the amount of lubrication from the spindle movement it needs. Without regular lubrication oxidation can form on the spindle. The brass drive nut around the spindel can get to much friction to move over the oxidized parts. To solve this lubricate the spindle trough the long opening at the side and let the printer slowly run the X arm up and down the lenghth of the maximum Z displacement. - If You have a LUTUM with touchscreen and the above is not possible becasue the Z movements is still stalling?
Please follow the link to a blog post on Z-stall below. - If the above options do not Solve the issue, please contact VormVrij 3D
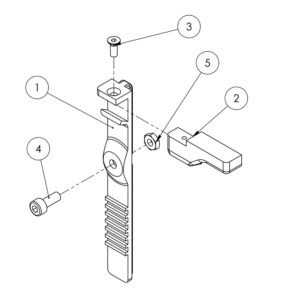 The Z probe is assembled from 2 plastic parts [1, 2], the parts are attached to each other with:
M3x6 hex screw[3]
M4x10 hex bolt [4]
M4 nut [4]
The quickest way to replace any of the plastic parts is to order via our partner Shapeways. please follow the link.
Take note that you need to thread the little hole in part [2] with M3 for a proper fixture.
The cost for the full replacement set starts at €39,62 ex VAT, ex shipping.
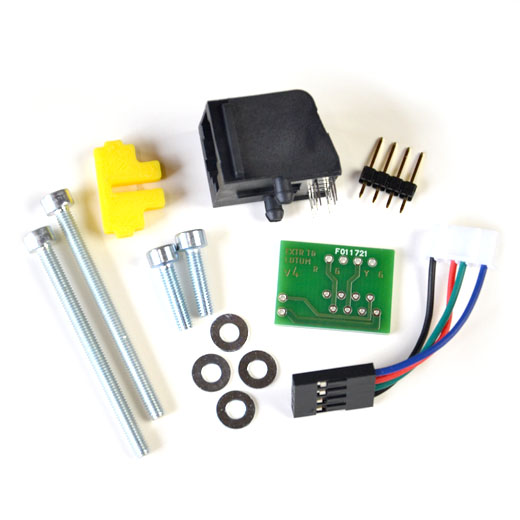 Depending on the type of eco extruder Kit you purchased you could encounter a few difficult parts to assemble.
notably:
- The UTP/RJ45 socket that goes into the housing attached to the motor.
- The Auger screw seals and the coupler to the motor.
- fixing the air socket to the cap.
For the Full DIY kit:
- The boring of the Barrel.
- The boring of the 3mm holes for the motor connector.
- Attaching the 3/4″ SST clay inlet.
We have made a page with resources when you can’t get the parts assembled.
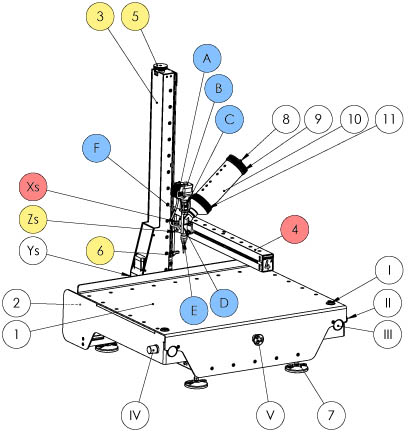
Main printer parts
1. Main printer base
2. Y – axis
3. Z – axis
4. X – axis
5. Z – manual height adjustment wheel
6. Z height limiter
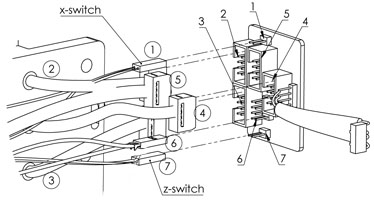
Xs. X limit switch
Zs. Z limit switch
Ys. Y limit switch
7. Adjustable machine feet
8. Cartridge air pressure connector
9. Aluminium cartridge cap
10. Aluminium cartridge tube
11. Stainless steel cartridge funnel
A. Extruder connector housing
B. Extruder motor
C. Motor to barrel coupler
D. Barrel
E. Nozzle
F. Data connector
I. Air plug to cartridge
II. Adjustment valve
III. Mano meter
IV. 2nd valve system
V. Emergency stop button