What do you need to properly operate your 3D Clay printer
In general the information provided in this section is applicable for all VormVrij® branded 3D Clay printers. If there is a very different approach for a specific model, it will be highlighted in the provided answers below.
 After assembly and setting your machine up according to the assembly manual you are ready to print some files.
Included with the LUTUM 4M printer is an SD card, there are two folders with test files on the disk, in general these are easy files to print.
some first tips:
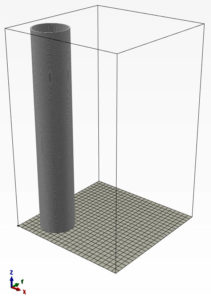
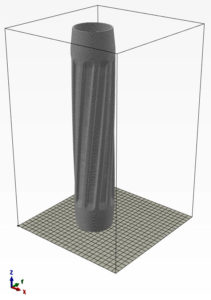
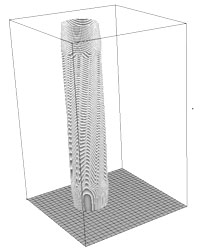
- start with the simple cilinder 70×400, if you find the printer not laying a circle without stuttering, decrease the print speed until it has a nice even movement. (practice file) this is normaly around 80% printspeed, Play with flow and pressure to see the immediate changes in deposition.
- If you see pulling in corners, increase flow or presure and/or decrease printspeed.
- Make the plaster wet before you print on it, (but no water should be present on surface when printing) this is better for fisrst layer adhesionand prorecte the print from drying too quickly (water evaporated from plaster goes around print).
- use the small brush to keep the start and end of print lines in place for the first (and or second) layer and/or increase flow a little for good adhesion.
folder: ‘examples 4M’
These files are all 1×3 (layer height 1 – nozzle 3mm)
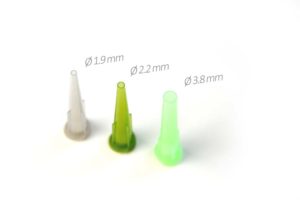
you can use the light green nozzle. or cut the dark green nozzle down to exact 3mm.
The light green is actually a little bigger (4mm outer radius) and might give some issue with the basket and cube file.
folder ‘gcode testfiles …june’
![]()
test-1 , the cylinder is standard 3mm nozzle but it’s a single walled structure and can be tried with every nozzle (adjust pressure+flow to accomodate for the nozzle size)
test-2 , are 7 pieces and need the gray nozzle (fine clay) and has a 0.8mm layer height (Difficult print on a 4M)
test-3 , water drain is big and needs the 3mm nozzle and has a 1mm layer height
Some tips before you start printing
- Make the plaster wet before you print on it, (but no water should be present on surface when printing starts) this is better for fisrst layer adhesion and prorects the print from drying too quickly (water evaporated from plaster envelopes print).
- Use the small brush to keep the start and end of print lines in place for the first (and or second) layer and/or increase flow a little for good adhesion.
- If you have the iR Height sensor installed run a mesh bed probe sequence before you start printing.
There are Files and Apps that you need to prepare your files for printing or design your objects.
We recommend you use Prusa slicer to slice your object into gcode
Download and install the latest version vor your system.
: Download the latest PrusaSlicer from Prusa Reasearch
We provide a default preset to use with your Prusa slicer
: Download the VormVrij Prusa preset files for LUTUM 4M (coming soon)
: Download the VormVrij Prusa preset files for LUTUM 4M+ (legacy)
To view or edit code in a text editor we recommend to use notepad++.
: Download NotePad++ from Notepad-plus-plus.org
A simple free design program 123Design can be downloaded from our site (64bit Windows only)
: 123D_Design_R2.2_WIN64_2.2.14.zip
More indepth information about the above software packages can be found in the software section of our support pages.
 After assembly and installing your machine according to the assembly manual you are ready to print some files.
There are no sample file installed on your Printer,
Please download your test files here
: Prusa-configs-LUTUM4Mpro.zip
When you upgraded with the iR Height senor please select
: Prusa-configs-LUTUM4Mpro-IR.zip
They are written like ‘name – layerheight x nozzle diameter’. | filename-1×3 . gcode
The nozzle diameter is recommended size, but you can use other sizes if you want. The print result may vary as the printer assumes the nozzle to be the given size in the file (the nozzle size is hard coded in the Gcode of the file).
While printspeed and extrusion rate is set in the Gcode. You can adjust these values during or before printing without changing the Gcode file itself.
You can use the light green nozzle to start with.
 1.
1. 2.
2. 3.
3.
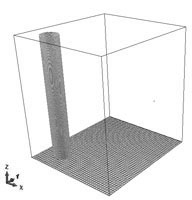
- Start with the cilinder : ‘test-1-cilinder-v2-2021-4Mpro.gcode‘, if you find the printer not laying a circle without stuttering, decrease the print speed until it has a nice even movement. Play with flow and pressure to see the immediate changes in deposition of the tube wall.
- For the next file you must use the gray nozzle, and non grogged clay.
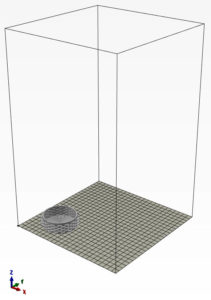
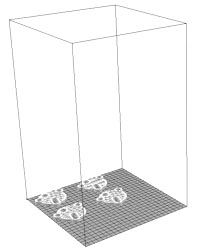
Once you get the hang of it you can try the next file : ‘test-2-coaster-4pcs-4Mpro-0.7×1.5.gcode‘, This file has has 4 small separate prints with grids and open structures. It is very its important you get the extrusion rate just right to avoid extruding excess clay that will mess up the print. This is a fine detail print and requires the gray nozzle! - The next file requires the light green nozzle.
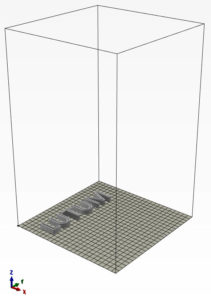
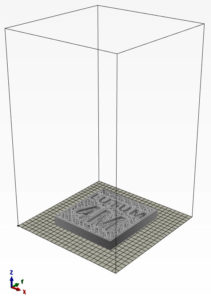
Try the last file: ‘test-3-water-drain-tile-4Mpro-1x3mm.gcode‘, it is a small mesh tile with the name of the 5M printer in it.
Some tips before you start printing
- Make the plaster wet before you print on it, (but no water should be present on surface when printing starts) this is better for fisrst layer adhesion and prorects the print from drying too quickly (water evaporated from plaster envelopes print).
- Use the small brush to keep the start and end of print lines in place for the first (and or second) layer and/or increase flow a little for good adhesion.
- If you have the iR Height sensor installed run a mesh bed probe sequence before you start printing.
There are Files and Apps that you need to prepare your files for printing or design your objects.
We recommend you use Prusa slicer to slice your object into gcode
Download and install the latest version vor your system.
: Download the latest PrusaSlicer from Prusa Reasearch
We also provide a default preset to use with your Prusa slicer.
: Download the VormVrij Prusa preset files for LUTUM 4Mpro here
: Download the VormVrij Prusa preset files for LUTUM 4Mpro with iR height sensor here
To view or edit code in a text editor we recommend to use notepad++.
: Download NotePad++ from Notepad-plus-plus.org
A simple free design program 123Design can be downloaded from our site (64bit Windows only)
: 123D_Design_R2.2_WIN64_2.2.14.zip
More indepth information about the above software packages can be found in the software section of our support pages.
 After assembly and installing your machine according to the assembly manual you are ready to print some files.
There is one file installed on your printer;
first-testprint-1x3mm.gcode
Please download your other files here
:LUTUM4.6-test-prints.zip
They are written like ‘name – layerheight x nozzle diameter’. | filename-1×3 . gcode
The nozzle diameter is recommended size, but you can use other sizes if you want. The print result may vary as the printer assumes the nozzle to be the given size in the file (the nozzle size is hard coded in the Gcode of the file).
While printspeed and extrusion rate is set in the Gcode. You can adjust these values during or before printing without changing the Gcode file itself.
You can use the light green nozzle to start with. (This nozzle is actually a little bigger (3.8mm outer radius) and might give some unexpected result when used with the ‘first test print’ file.)
 1.
1. 2.
2. 3.
3.
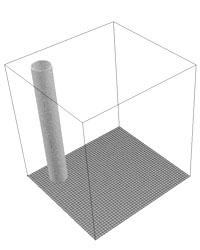
- Start with the simple cilinder : ‘cilinder-70x500mm-spiral-1x3mm‘, if you find the printer not depositing a circle without stuttering, decrease the print speed until it has a nice even movement. Play with flow and pressure to see the immediate changes in deposition of the tube wall.
- For the next file you can also use the dark green nozzle. (same as testprint on machine)
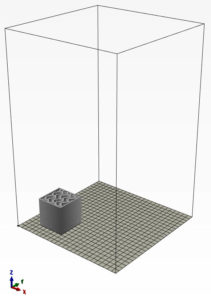
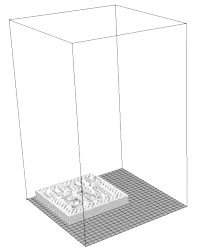
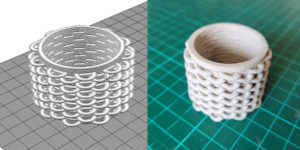
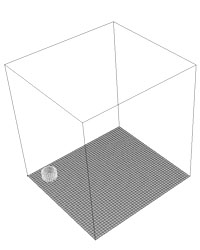
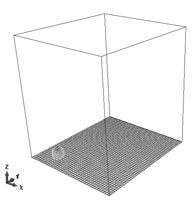
Once you get the hang of it you can try the next file : ‘knit-cup-60x60x37mm-1x3mm‘, This file has a few solid bottom layers so its important you get the extrusion rate just right to avoid extruding excess clay that will mess up the print - The next file requires the light green nozzle.
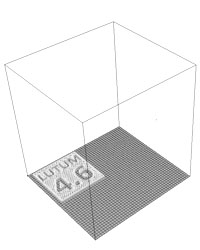
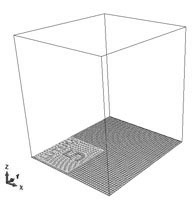
If you got that one done you can start designing your own or try the last file: ‘LUTUM4.6-tile-160x160mm-1x3mm‘, it is a small mesh tile with the name of the printer in it.
Some tips before you start printing
- Make the plaster wet before you print on it, (but no water should be present on surface when printing starts) this is better for fisrst layer adhesion and prorects the print from drying too quickly (water evaporated from plaster envelopes print).
- Use the small brush to keep the start and end of print lines in place for the first (and or second) layer and/or increase flow a little for good adhesion.
- If you have the iR Height sensor installed run a mesh bed probe sequence before you start printing.
There are Files and Apps that you need to prepare your files for printing or design your objects.
We recommend you use Prusa slicer to slice your object into gcode
Download and install the latest version vor your system.
: Download the latest PrusaSlicer from Prusa Reasearch
We also provide a default preset to use with your Prusa slicer.
: Prusa-config-LUTUM4.6.zip
To view or edit code in a text editor we recommend to use notepad++.
: Download NotePad++ from Notepad-plus-plus.org
A simple free design program 123Design can be downloaded from our site (64bit Windows only)
: 123D_Design_R2.2_WIN64_2.2.14.zip
More indepth information about the above software packages can be found in the software section of our support pages.
 After assembly and installing your machine according to the assembly manual you are ready to print some files.
There are 3 sample file installed on your Printer, they are written like ‘name – layerheight x nozzle diameter’. | filename-1×3 . gcode
The nozzle diameter is recommended size, but you can use other sizes if you want. The print result may vary as the printer assumes the nozzle to be the given size in the file (the nozzle size is hard coded in the Gcode of the file).
While printspeed and extrusion rate is set in the Gcode. You can adjust these values during or before printing without changing the Gcode file itself.
You can use the light green nozzle to start with. (This nozzle is actually a little bigger (3.8mm outer radius) and might give some unexpected result when used with the ‘first test print’ file.)
 1.
1. 2.
2. 3.
3.
- Start with the simple cilinder : ‘cilinder-70x400mm-spiral-1x3mm‘, if you find the printer not depositing a circle without stuttering, decrease the print speed until it has a nice even movement. Play with flow and pressure to see the immediate changes in deposition of the tube wall.
- For the next file you can also use the dark green nozzle.
Once you get the hang of it you can try the next file : ‘first-testprint-1x3mm‘, This file has a few solid bottom layers so its important you get the extrusion rate just right to avoid extruding excess clay that will mess up the print - The next file requires the light green nozzle.
If you got that one done you can start designing your own or try the last file: ‘LUTUM5M-small-tile-200×200-1x3mm‘, its a small mesh tile with the name of the printer in it.
Some tips before you start printing
- Make the plaster wet before you print on it, (but no water should be present on surface when printing starts) this is better for fisrst layer adhesion and prorects the print from drying too quickly (water evaporated from plaster envelopes print).
- Use the small brush to keep the start and end of print lines in place for the first (and or second) layer and/or increase flow a little for good adhesion.
- run a mesh bed probe sequence before you start printing.
There are Files and Apps that you need to prepare your files for printing or design your objects.
We recommend you use Prusa slicer to slice your object into gcode
Download and install the latest version vor your system.
: Download the latest PrusaSlicer from Prusa Reasearch
We also provide a default preset to use with your Prusa slicer.
: Download the VormVrij Prusa preset files for LUTUM 5M here
To view or edit code in a text editor we recommend to use notepad++.
: Download NotePad++ from Notepad-plus-plus.org
A simple free design program 123Design can be downloaded from our site (64bit Windows only)
: 123D_Design_R2.2_WIN64_2.2.14.zip
Troubleshooting files.
The Firmware configuration file for the 5M, unzip the contents and use the config.g to repair the damaged file in your printer
: config.g for LUTUM5M-2023.zip
: config.g for LUTUM5M.zip
More indepth information about the above software packages can be found in the software section of our support pages.
 After assembly and installing your machine according to the assembly manual you are ready to print some files.
There are 3 sample file installed on your Printer, they are written like ‘name – layerheight x nozzle diameter’. | filename-1×3 . gcode
The nozzle diameter is recommended size, but you can use other sizes if you want. The print result may vary as the printer assumes the nozzle to be the given size in the file (the nozzle size is hard coded in the Gcode of the file).
While printspeed and extrusion rate is set in the Gcode. You can adjust these values during or before printing without changing the Gcode file itself.
You can use the light green nozzle to start with. (This nozzle is actually a little bigger (3.8mm outer radius) and might give some unexpected result when used with the ‘first test print’ file.)
1.2.3.
- Start with the simple cilinder : ‘cilinder-70x500mm-spiral-1x3mm‘, if you find the printer not depositing a circle without stuttering, decrease the print speed until it has a nice even movement. Play with flow and pressure to see the immediate changes in deposition of the tube wall.
- For the next file you can also use the dark green nozzle.
Once you get the hang of it you can try the next file : ‘first-testprint-1x3mm‘, This file has a few solid bottom layers so its important you get the extrusion rate just right to avoid extruding excess clay that will mess up the print - The next file requires the light green nozzle.
If you got that one done you can start designing your own or try the last file: ‘LUTUM5-small-tile-200×200-1x3mm‘, its a small mesh tile with the name of the printer in it.
Some tips before you start printing
- Make the plaster wet before you print on it, (but no water should be present on surface when printing starts) this is better for fisrst layer adhesion and prorects the print from drying too quickly (water evaporated from plaster envelopes print).
- Use the small brush to keep the start and end of print lines in place for the first (and or second) layer and/or increase flow a little for good adhesion.
- run a mesh bed probe sequence before you start printing.
There are Files and Apps that you need to prepare your files for printing or design your objects.
We recommend you use Prusa slicer to slice your object into gcode
Download and install the latest version vor your system.
: Download the latest PrusaSlicer from Prusa Reasearch
We also provide a default preset to use with your Prusa slicer.
: Download the VormVrij Prusa preset files for LUTUM v5 here
: Download the VormVrij Prusa preset files for LUTUM v5 XL here
To view or edit code in a text editor we recommend to use notepad++.
: Download NotePad++ from Notepad-plus-plus.org
A simple free design program 123Design can be downloaded from our site (64bit Windows only)
: 123D_Design_R2.2_WIN64_2.2.14.zip
Troubleshooting files.
The Firmware configuration file for the 5M, unzip the contents and use the config.g to repair the damaged file in your printer
: config.g for LUTUMv5-2023.zip
: config.g for LUTUMv5.zip
: config.g for LUTUMv5XL-2023.zip
: config.g for LUTUMv5XL.zip
More indepth information about the above software packages can be found in the software section of our support pages.
Where can I download the Assembly Manual ?
We do not provide the LUTUM manual as a download.
If you have access to a LUTUM printer and need a replacement manual please email us while providing your printers model and serial number. The serial number can be found on the back of the machine.