The LUTUM® extruder system
Advantages and disadvantages of the LUTUM® Auger system.
I often get asked why we designed our printer the way we did. Why we use air and auger for clay delivery, why our printer is black, why we want to print with clay.
Today I am going to answer just one question. The extrusion technology and the idea behind it.
As you might know there are currently several solutions to 3dprint with clay. In 2014 there was only one option. Direct extrusion via compressed air. A technique put forward by Jonathan Keep and Dries Verbruggen. The results were often rough and very craft like in appearance. While they had ventured into the area of controlled extrusion with auger and piston style systems it did not reach sufficient print results to go mainstream.
Today, anyone starting to print with clay on DIY printers would start with similar continuous flow principles. It is simple, cheap and easy to design. But there are limitations to what can be printed on such a setup.
When we started 3d printing clay we quickly reached the end of diversity in our prints and within a few months of experimenting we found that consequent designs were all adaptations of earlier solutions. It became clear we had to redesign the way we would control clay output to reach a level of printing capabilities on par with regular 3dprinting.
There were a few restrictions we had to consider if we ever wanted to commercialize this technology. While we needed high precision and controllability it also had to be cheap, safe, reliable and manufacturable.
We started with cheap prototypes from simple bits and pieces found in hardware stores. While the proof of concept of auger extrusion was shown the print results did not meet our own standard, and we decided to leave the path of economics and went to design a new system from scratch.
The first thing we were concerned about was the volume of production. Not the clay prints produced by the printer, but the actual extruder itself. For example, to create the auger part of the extruder we had to contract a specialist CNC lathe company. One auger would become prohibitively expensive to make unless we would order a few hundred at a time. This would pose a serious risk, as we would have to sell our stock before we could develop improvements. The only solution would be to 3D print the metal parts we needed. This was more expensive but gave us the possibility to gradually imrove our technology without huge initial investments. We produced batches of ten printers at a time and improved upon that batch with the next batch of ten.
Since XYZ movement was straight forward the focus went to the extruder.
One of the more complicated parts was the delivery of clay to the extruder. How to move the clay from place A to place B with as little effort as possible but with high reliability.
We sticked to the Large Clay Vessel and compressed air as we had much experience with such a system while printing without an Auger. Clay and compressed air dynamics were somewhat understood and we thought we largely knew what to expect when building on top of such a system.
Five factors emerged which were crucial to get good extrusion.
– the strength and rotation speed of the motor
– the way the clay is received by the Auger
– the shape of the Auger
– the seal of the system
– the shape of the nozzle
To keep the design flexible and simple opted for manual air and manual adjustable rotation settings via firmware of the printer. This solution would provide a fixed nozzle width for a Gcode design file but flexibility towards the properties of the clay.
The motor requirements were quickly established as a regular 4N one had a hard time to move the clay, especially with large volumes. A geared motor proved a good solution and we have stuck to that ever since.
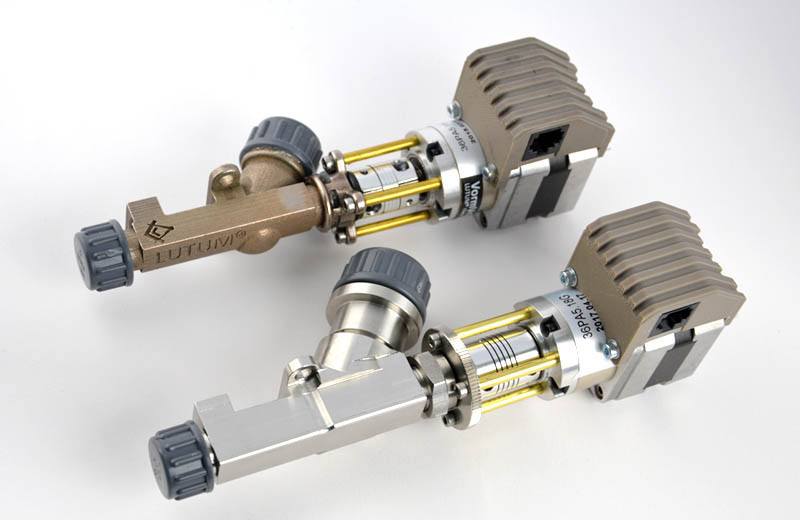
The way the clay is fed to the Auger was also found reasonably fast. It’s slightly different to regular Auger systems where material is fed in a type of trough where the auger turns at the bottom.
The tip and seal of the system had to be made from standard parts as those would wear or damage first. To release the pressure on individual seals we decided to spread the load by using three seals in sequence. Grease mixed with clay would act as the bearing and pressure cushion around the shaft.
It turned out that the tip at the end of the extruder was responsible for much of our frustration during the design proces. Since we started with continuous flow extrusion we really appreciated the freedom of nozzle size to dictate the width of the extrusion.
This freedom had to be translated into the new auger based design.
Unfortunately tip size has direct relation to the pressure needed to extrude clay. The smaller the nozzle the higher the pressure at the end of the auger needs to be. If the clay is not the right viscosity this pressure could result in segregation between clay particles and water.
Water would be forced up and dry clay would go down clogging the system and worsening the situation. On top of that particle flow dynamics around the auger itself also make things difficult.
Our first design still had to use fairly soft clay. Because we used tubed delivery this was not an issue. Our first line of extruders were performing well. They would extrude clay fairly constant, had no particular signs of wear (apart from the occasional seal) en were easy to operate.
But the results were still not perfect. Air bubbles and other irregularities in the clay would give errors in the print which we did not want.
Don’t get me wrong, I love the randomness of clay printing, the results of poorly mixed clay can by quite fascinating. But from a technological point of view one also had to be able to print perfect, all the time for days in a row if this machine would become a reliable partner in any production facility.
So we turned our focus to clay and how clay was prepared normally. Immediately pug mills and hand presses came into view. Most ceramist had one of these already and while we recognized these as a practical solution to mix and de-air clay, the viscosity was very different compared to the clay used in Air and tubed delivery.
We had to move the clay closer to the Auger and developed the micro cartridge for that purpose.
This proved a fantastic solution, the clay would enter the Auger with much lower pressures compared to our tube fed system. And without the tube the clay latency by compression went almost to zero resulting in even better control.
But we had to redesign the auger or change to a different motor to cope with this tougher material. We tried both, a reduced 12N motor did the trick. Clay was pushed through and we could print with much harder clay than before. Unfortunately the Auger was not the right shape for this clay. It took another few weeks to get the correct design conditions and build an auger that would properly move hard clay down a tube. We did realize that the difference between grogg and hard clay was smaller compared to our previous viscosities and to our delight we could push grogged clay with the same ease as regular clay.
Our new extruder design in combination with the small cartridges holding about 1kg of clay has given us a tremendous freedom in design and we feel we have reached almost the same level of control as printing with plastics. Of course clay has its own particulars, like shrinkage, gravity, vibration and climate sensitivity, but when taking those conditions into account we can print nearly everything.
A disadvantage of this solution is the need to regularly swap cartridges. Especially when printing a lot or large objects. If the clay between swaps is of different consistency this will result in an obvious seam. Great care is needed when preparing clay and cartridges need to be numbered to minimize seam issues.
Switching a cartridge takes about 15 seconds. Another minute to normalize pressure in the tip. Using the swap cartridge feature in the firmware to expel contact air and excess water reduces print irregularities. But that is a different story.
The Auger system is a simple ‘affordable’ system for controlling clay flow. Start and stop sequences are easy to execute. Compressed air is used to move clay to the extruder. Printing objects with 1kg (750cc) of clay is straight forward. There is the possibility to print bigger but that requires additional actions. Since almost every ceramics studio has compressed air most times there is no need to invest in a separate compressor. Nozzle size is variable but only up to around 7mm diameter. This system is optimized to create objects of small to medium size. You do need a Pugmill or mechanical hand press to get ultra quality prints. Compare it to filament quality, good filament gives better results. The same goes for clay.